Pages

Wednesday, December 30, 2015

Congratulations Card

Dear Crafty Friends,

Wishing you all a Very Happy And Prosperous New Year!
May your year filled with so many beautiful projects and crafty goodies ;-)!!

Here is my DT card using All Glammed Up Collection by Heartfelt Creations. Hope you will like it!!


Heartfelt Products :

All Glammed Up Paper Collection HCDP1-260
All Dressed Up Die HCD1-775
All Dressed Up Cling Stamp Set HCPC-3704
All Glammed Up Sentiments Cling Stamp Set HCPC-3707

Other Products : Tim Holtz Red Brick distress ink, Red ad Black card stock, Foam dots and pearl pen

Instructions :
This is 7x5 card. Base is Red cardstock and layered with Black card stock and a designer paper.
This beautiful die cut is distressed with Red Brick ink and added small pearls using Pearl Pen.
Using foam dots this lovely gown raised a bit to give more dimension. Sentiment stamp is from the same collection.
Hope you will love this simple and elegant card.
Thanks for stopping by.

Wednesday, December 23, 2015

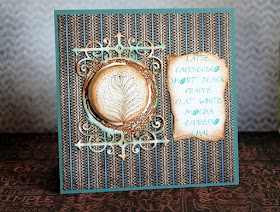
Coffee Menu Card - Heartfelt Creations

Coffee Menu Card


Heartfelt Creations Products :
The Perfect Blend Cling Stamp Set HCPC-3712
Latte Art Cling Stamp Set HCPC-3711
Everyday Heroes Die HCD1-761
Coffee Talk Paper Collection HCDP1-261

Other Products : Glue, Blue Cardstock, Stampin Up Chocolate Ink pad, Blue inkpad, Tim Holtz Vintage Photo ink, White Cardstock

Instructions :
This is 6x6 card using blue cardstock and layered with this pretty paper from the collection. This wonderful diecut is Everyday Heroes Die.
On this diecut I just stamped coffee stain stamp and one of the stamp from Coffee Latte Art stamp set. On one piece of white cardstock I have stamped this Menu list and distressed edges and stick on one side.
Pretty simple card but with these stamps it is just perfect for coffee lovers.
Thanks for stopping by!

Wednesday, December 16, 2015

Shaker Card

Dear All,
Here is another card using Heartfelt Creations stunning collection - Coffee Talk


Heartfelt Creations Products :
The Perfect Blend Cling Stamp Set HCPC-3712
Coffee Talk Cling Stamp Set HCPC-3709
Coffee Talk Die HCD1-782
Clear Cardstock 8.5 x 11 GBCC811

Other Products : Blue and White Card Stock, Tim Holtz Vintage Photo Ink, Blue stampin up ink, Prima Mica Copper flakes, Foam dots


Instructions :

This is 6x6 card. Basic 6x6 card panel is in blue layered with white card stock which is 5 3/4" X 5 3/4". On white layer I have stamped this really cool image of coffee beans and sentiment. 
I have stamped the coffee stain image and die-cut the circle in the center to make the shaker card. I have used a piece of clear card stock to make the winder for this shaker card. This coffee cup and spoon die cut is awesome touch for this card theme.
I hope you will love this card. 

Thanks so much for visiting.

Thursday, December 10, 2015

Winner of Heartfelt Creations Giveaway!!

Dear all,
I am so very sorry for the delay to pick the winner. We are expecting a baby in Jan and I am kind of wrapping up my craft life.
But anyways....here is the Random Lucky Winner of 12X12 Heartfelt Creations Paper pad!!
Drum Roll Please....

Comment #33

 Wheelie Crafty - Rhonda Alman from Australia!!


Congratulations!
Please contact me at mycreativecorner@yahoo.com with your address and I will send your papers!!

Thanks each and everyone for visiting, commenting and subscribing my blog!!
Hope you will visit me again!!
Love,
Archana

Wednesday, December 9, 2015

Coffe Recipe Book - Coffee Talk - Heartfelt New Release

Dear all,
I am sorry for the late post today.
I am super excited to introduce another beautiful and very tempting release by Heartfelt Creations!!

So here you go....a cute idea of a recipe book gift to coffee lovers :-)


Products Used: 
Coffee Mug Cling Stamp Set
Coffee Mug Die
The Perfect Blend Cling Stamp Set
Coffee Talk Cling Stamp Set
Coffee Talk Die
Birds and Blooms Cling Stamp Set
Leafy Branch Die

Coffee Snack Recipe Collection!!


Project Instructions: 
Other products: Tim Holtz Vintage Photo, purple, blue ink, White Cardstock, Golden Embossing powder, Versa Mark, Blue Ink, Binder Ring, Blue Seam Binding, Some easy snack recipes

Coffee Snack Recipe Collection!!

Instructions: This is a small recipe book using the Coffee Mug stamp and die. Cut 9 cutouts with two of them using thick Chipboard as a front and back cover. Front cover is stamped with Coffee Mug stamp, but rest of these are just coffee mug die cuts. Using versamark and golden embossing powder, I have created bit antique gold touch to the mug and a spoon. The rest of the cup is distressed with Tim Holtz inks in coffee, blue and purple color.
I have printed a few recipes on cardstock and diecut with coffee mug die. Also used some coffee beans stamp all over inside and distressed edges. And on back side I have used designer paper die cut as well. For handle tied a seam binding bow and create flower cluster on the side. I have used binder ring on left side so it will be easy to open it like a book. Stamped the sentiment and here is a small recipe book which you can keep it in your kitchen or give as a gift.

Thank you!!

Friday, November 27, 2015

Black Friday Heartfelt Creations Release - Flip Fold Albums

Dear All,

Surprise....This product will be a really sweet surprise for Album makers. 
Heartfelt Creations came up with really convenient products for mini album makers. They have Albums and Flip Fold inserts and pockets and they come in three colors, Black, White and Craft. Which are always our basic colors for our album. First time this happened to me that I completed two albums within 4 days. Usually it takes almost a month for me to finish and most of the time I loose interest while cutting, measuring and hidden pocket ideas and all. So here you go...I am sure you will love this. 

With this product release.....I would like to keep small GIVEAWAY for my super sweet FOLLOWERS only. To enter in the giveaway, you only need to follow my blog and comment on this post. Winner will be announced by Dec 7th. Prize picture is at the end :-)
Open to USA and International Crafty Friends!!

I created two albums for this post. One is Peacock Paisley and one is my all time favorite collection Birds and Bloom. 

Peacock Paisley Album

Peacock Paisley FlipFold Album  

Peacock Paisley FlipFold Album


Heartfelt Creations Product :

HCFA1-431 Flip Fold Album in Black
HCFP1-433-1 Pocket and Flipfold Inserts A-Black
HCFP1-434-1 Pocket and Flipfold Inserts B-Black
HCFP1-435-1 Pocket and Flipfold Inserts C-Black
HCFP1-436-1 Pocket and Flipfold Inserts D-Black
252 Peacock Paisely paper Collection
3656 Delightful Daisies Cling Stamp Set
760 Delightful Daisy Die
3660 Peacock Swirl Cling Stamp Set
771 Peacock Paisely Die
778 Fleur Borders and Pockets Die
779 Regal Borders and Pockets Die
730 Decorative Butterfly Die
Art Institute Glue - Dries Clear
Deluxe Flower Shaping Kit
Bottle Cap Super Strong Magnets

Other Products : Tim Holtz Distress Ink in Blue, Green, Orange, Vintage Photo, Blue Organza ribbon, Bling, Foam Dots

Instructions :

This album is really easy to make using all the flip fold pages and pockets. These products made my life so easy otherwise I couldn't complete my albums so quick before.
As you can see I only cut the designer papers as per the size of all the flip folds and adhere and using magnet created flaps and closer. Using flower making tool, stamp and dies I made all these pretty flowers and created flower cluster on the album cover.


What do you think :-)

Now here is the another one !!

Birds and Bloom Album

Birds and Bloom FlipFold Album

Heartfelt Creations Products :

HCFA1-431 Flip Fold Album in White
HCFP1-433-2 Pocket and Flipfold Inserts A-White
HCFP1-434-2 Pocket and Flipfold Inserts B-White
HCFP1-435-2 Pocket and Flipfold Inserts C-White
HCFP1-436-2 Pocket and Flipfold Inserts D-White
HCD1-778 - Dies
HCD1-779 Regal Borders Pockets Die
HCD1-780 Ornate Borders and Pockets Die
HCDP1-250 Birds and Bloom Paper Pad
HCD1-756 Birds and Bloom Die
HCD1-757 Leafy Branch die
HCPC-3644 Birds and Blooms Cling Stamp set
HCPC-3645 Leafy Branch Cling Stamp set
HCPC-3651 Botanical Rose Cling Stamp
HCD1-758 Botanical Wings Die
Bottle Cap Super Strong Magnets
159723 Art Institute Glue
CST1-401 Flower Shaping Kit

Other Products : Tim Holtz Stickles,Tim Holtz Ink, Orange, Black Card Stock, White Card Stock,Pink Cardstock Black Ink, Foam Dots, Light Green Ribbon, Resin Frame


Project Instructions : 
For this album I have used White Album an White Flip Flop pockets and inserts. All cutouts are from the designer papers in size of album pages, pockets and inserts.
Flowers are made using mentioned stamps and dies.
This album is very easy to uses and specially inserts and pockets are super convenient.

Hope you will like them. Please visit Heartfelt Creations Blog for more info. 

Winner will be announced on Monday, Dec 7th

Giveaway Prize

Cascading Fuchsia Paper Collection: click to enlarge


Thanks for stopping by. Have a Happy Thanksgiving!!

Youtube - https://www.youtube.com/channel/UCVe9_PZdOiqOuftls4fOncg

Facebook Fan Page - https://www.facebook.com/Archu76/

Love,

Archana

Friday, November 20, 2015

Youtube Hop Projects and Giveaway !!

Dear All,
Please visit my channel and have fun hop. If you liked my project then Comment, Like and Sub please to win the giveaway prize.


For this hop I have created some small gifts and a Ornament.


EOS box I inspired one of my favorite crafter, Sam Donald. I love her projects a lot!


Thanks so much dear all!

Wednesday, November 18, 2015

Shoe Card - Heartfelt Creations !!

Dear All,
Another project for Heartfelt Creations new release. I am in love with this another shoe style. Isn't it pretty :-)


Heartfelt Creations Products :

All Glammed Up Paper Collection HCDP1-260
All Glammed Up Shoe Die HCD1-774
All Glammed Up Shoe Cling Stamp Set HCPC-3703
Bright Ideas Prills ANC852
Art Institute Glue - Dries Clear 159723

Other products : Pink cardstock, Tim Holtz Fired Break Ink, Yello, Green and Blue Copic Markers, Perfect Pearls, Foam dots


Project Instructions:

This is 6x6 card using plain pink white card base and layered with this awesome black scripted background paper from the collection which is 5 3/4" by 5 3/4".
I got the diecut this shoe and with douber and Red Tim Holtz ink just destressed the edgges. This beautiful design colored with blue, yellow and green copic markers and used Yellow golden Prillis as a flower center.
Using foam dots under the shoe diecut to rais this a little bit. Also used Perfect Pearl to make these cute little pearls on it.
Thanks so much for stopping by!

Friday, November 13, 2015

Envelope for Dimensional Cards

Dear all,

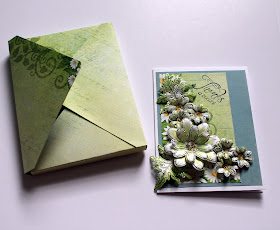
I make lots of cards using 3D flowers on it and there is always a question, how to handover it to the person. Most of the people use plastic bags. But here is a wonderful way to present this card in matching boxed envelope.

I hope this tutorial will be helpful to you. I am giving all the measurements and instructions for standard A2 size card which measures 5.5" X 4.25". If you like this tutorial and you want me to give in certain sizes feel free to ask.

Material :
12X12 paper, Glue, Cutter, Score board, corner punch (optional), pair of scissor.

Instructions :
First cut the paper in size of 9"X 9" using your paper cutter.


Then get the score board and use the extension comes with it for making envelops ( Martha Stewart cutter has this additional triangular shape measuring thing)

Get your paper on the score board and score on 3 5/8" and 4 1/8 "


Turn the paper at 90 degrees and score at 2 3/4" and 3 1/4"


Turn again and score at 3 5/8" and 4 1/8 " and then last turn and score at 2 3/4" and 3 1/4"  So your two opposite sides are large and two sides are small.

Your score lines will look like this when you done your scoring job.


Now if you want you can trim all 4 corners or just top and bottom corner in round or any of your choice shape.


Now please look at the pencil marked triangles. We need to cut two of the small triangles from both side of the bottom and whole both large triangles on top....hope you got it ;-)


Then your envelope shape will look like this.


Now just cut those bottom squares like this. Do not cut all the way. But if you cut it all the way do not worry still your box is safe. But just for extra sturdiness we just need to keep them. 


Now fold all the score lines and it is now getting in shape :-) 

Assemble your box using strong glue or sticky tape inside the bottom fold on both edges and also on those two square notches.


Here you go...isn't this easy, neat and pretty :-)


My beautiful card using handmade 3d flowers and Matching Envelope 


Lovely....


Perfectly fit and ready to present...

You can even decorate the envelope from out side using flowers, sentiments, ribbons....options are limitless.


Now no more worries of presenting your wonderfully decorated dimensional cards.
Have fun !!


Love,
Archana